


I love to read. I love the feel of a good book in my hand, cuddled up with a chair, blanket, and hot tea. I love the classics, romance, character novels, and good science fiction -- you know the kind where half way into the book you realize that all of the strange things in the book seem completely probable and normal....
I have always been a reader. In elementary school I was the girl who had so many AR points that eventually I started buying candy for my friends. And one year they made a race track around the cafeteria and gave each kid a paper car. As you earned points your car moved around the track. There were always the stragglers at the end, but most people were grouped together, but up at the front way in the lead were two cars. An Asian girl and me. Yes I was that girl. Lately, I have come to appreciate books for another purpose. As I have been traveling to my interviews I have LOVED having something to read, or in this case, listen to on my phone to keep me entertained. With that said...I need a little help. I need some tips on good reads.
It seems like lately, I have read it all. Travis and I have been listening to the Millennium Series on our drives across Texas and are saving the last book for our trip down to H-town for interviews in December. I am in the middle of the Friday Night Knitting Series, but I think I am about to finish it soon. And it just feels like I have read all of the other good books out there....so here is my public plea for help. Does anyone know of any good books?? Preferably ones that will keep me entertained in airports??
Any and all tips are welcome!
Tuesday, November 8, 2011
Thursday, November 3, 2011
I've been featured
Hey Guys! Just another quick note to let you know that Stephnie of Under the Table and Dreaming featured my couch {yay!} along with some really neat furniture/bedroom makeovers! Click the link above to go directly to the post or on the side and go to her home page!
I'm so excited/honored to be featured by Stephanie! If you are visiting from her blog, then its SO nice to meet you. Check out "the halls" to learn a little about us!
I'm so excited/honored to be featured by Stephanie! If you are visiting from her blog, then its SO nice to meet you. Check out "the halls" to learn a little about us!
Thursday, October 20, 2011
Faux-denza
Thanks for all of your encouraging feedback about the wall stencil! It was so much fun to do and share. I have another project that I am working on, we like to call it our faux-denza. Its not a shelf, its not a credenza, its a faux-denza! Also, its an IKEA hack. And man I love me some IKEA hacks.
So, heres the deal. Before Travis and I were married I loved the simplicity of the narrow stretch between "dining" and "living" (its really all just one big L shaped room). It was nothing but green walls and 2 old doors. This was back before I compulsively photo documented everything, just incase, I ever needed the picture. So the picture below does not do the space justice. Although you can say HI to my granny and aunt janet! Anyway, just imagine how sharp my white table with retro green cushions looked off to the right of that space and those doors.

After Travis and I got married I needed places to store "things", and so we decided to purchase this. Its part of IKEA's Expedit shelving line. If you look closely you will see that the smaller units are not functional, per say.

We layed the unit on the floor horizontally and then used the bottom for storage and the smaller areas for display. In order to hide the bottom ugly parts we made some little curtains from muslin. It was....fine, but I've always wanted to do more. Here you can see what we have now:


Looking at the pictures there are a few things I don't like. 1. I feel like this heavy piece on the floor really weighs things down. 2. The console is so dark it really pulls down the sharp green walls. 3. The curtains are, fine, but nothing exciting. So to address these issues we have decided to do some major console renovation. First, we ordered 6" legs for this baby. Our baseboards are 5" so this will be just tall enough. But the real project is turning this console into a faux-denza. And here is how we're going to do it.
We are going to make 2 doors to cover up the bottom row of storage, and of course, I had something a little fun in mind for spicing up the outside of the doors. So, I needed some inspriation.

I really love these vintage kittinger chests. Hello greek key goodness.

and this console, room by Emily Henderson.
(and don't even get me started on how awesome the wall paper is)
So I decided that I wanted to use these two peices as my jumping off point. So before I get too carried away I should probably just give you a bare bones run down.
Faux-denza to-do-list:
1. purchase painters grade wood and cut to size
2. paint wood glossy white
3. purchase wood molding
4. decide on arragement for the greek key effect
5. cut wood molding into peices
6. spray peices gold
7. attach peices to door with wood glue
8. cut vertical slats of consol, so that once doors are placed they will be flush with the sides
9. attach legs to console
10. attach doors to console
11. poof, faux-denza!
So, these instructions are pretty simple and not at all detailed, but as we go along I plan to do a couple of posts showing our progress! I am so excited to see the finished product!
Tuesday, October 18, 2011
Time to make lemons
Well, thankyou for bearing with me after my short post earlier! I was so excited to be featured I just wanted to let everyone know, but had to get back to the clinic. If you are visiting from 36th ave. then its a pleasure to meet you! If you wanna know more about me or this blog then click "the halls" to get all of the deets!
I know I've posted many pictures of our house, but I haven't shared one of my favorite parts of the house. When I started my OB/GYN rotation back a year ago I spent a week on night float and 3-4 really crazy weeks that we didn't get to see much of each other. We didn't like not being on the same schedule, but we decided to find a way to make things better...and the result is one of my favorite parts of our house.


I know I've posted many pictures of our house, but I haven't shared one of my favorite parts of the house. When I started my OB/GYN rotation back a year ago I spent a week on night float and 3-4 really crazy weeks that we didn't get to see much of each other. We didn't like not being on the same schedule, but we decided to find a way to make things better...and the result is one of my favorite parts of our house.
First thing, a chalk board to write short notes to each other!

Second, a love tree. Exclusively for little love notes

I love going back and looking at our notes later.

I even love the supplies. clothes pins and milk glass and chalk. Oh My!

These were so easy to make. Grey cardstock, off white card stock, stamp, gold ink.

The stamp says "Uniquely Handmade limited edition". I thought it fit.
So thats it, my favorite part. Funny how its never the expensive lighting or appliances.
I've been featured
Hey Guys!
I have some great news, Desiree from 36th avenue featured my couch makeover!! Woo Hoo :) click on the link above to go directly to the post where its featured along with some really CUTE fall projects that some of her readers have been up to! I really love Desiree's blog, she always has such cute projects and ideas! I think y'all should really check out her mud closet; it's so cute it makes me want to delve into our closets {scarry thought}!

I'm on a lunch break now, I've been working in the pediatric sub-specialty clinics and having a BLAST! Just wanted to give everyone a heads up!!!
I have some great news, Desiree from 36th avenue featured my couch makeover!! Woo Hoo :) click on the link above to go directly to the post where its featured along with some really CUTE fall projects that some of her readers have been up to! I really love Desiree's blog, she always has such cute projects and ideas! I think y'all should really check out her mud closet; it's so cute it makes me want to delve into our closets {scarry thought}!
I'm on a lunch break now, I've been working in the pediatric sub-specialty clinics and having a BLAST! Just wanted to give everyone a heads up!!!
Thursday, October 13, 2011
Casa de Hall
Hey Guys!
Here is an idea of something sweet, simple, and inexpensive to do for your significant other. But first, a story. For the longest time Travis and I have been wanting to go to Sante Fe for the weekend. Unfortunately, timing and money have not allowed us to make a trip West. So, for labor day weekend I turned our house into our own special bed and breafaskt, Casa de Hall.


Here is an idea of something sweet, simple, and inexpensive to do for your significant other. But first, a story. For the longest time Travis and I have been wanting to go to Sante Fe for the weekend. Unfortunately, timing and money have not allowed us to make a trip West. So, for labor day weekend I turned our house into our own special bed and breafaskt, Casa de Hall.
Here are a few picture of what I did; along with some easy and simple ideas! First I made some stationary using Micrsoft Publisher. These two little notes were really simpe to make, but I thought that it made things feel more special.


The menu Travis could choose from was: Make Your Own Omelette, Breakfast Burrito, Chocolate Chip Pancakes, Belgium Waffles, and Blueberry Pancakes. Breakfast was served with fruit, and a choice of orange juice or sparkling grape juice.
On the morning of, I got up early and went to the store to pick up some hydrangeas and fruit; when I returned I wrote Travis a note saying "Thank you for staying at Casa de Hall, breakfast will be served at 10am. Until then feel free to sleep in or enjoy our spa services." (Our "spa" services were a candle lit bubble bath and a hot oil massage). I laid out the china and set the table so when he woke up he could order his breakfast.

Mason jars for the hydrangeas and a gold frame for the Casa de Hall sign makes it feel more legit. And I love the way our china looks just plain -no mats or chargers- sitting out in the natural light.

Our pattern isVera Wang Grosgrain

So, there you have the run down of our little weekend! I'm sure that Travis could have cared less about hydrangeas and cute stationary, but it made just a normal morning feel special for us; which is the real reason we were wanting to get out of town anyway! I think the biggest blessings are always in the small things.
Linked up with:
Monday, October 10, 2011
Faux Wallpaper
Here are some pictures of the stenciled wall paper. I wanted to put them in the post with the explanation, but it was too long! What do you think?

View from the doorway {still so much to do}

Our dresser in Weathervane by Martha Stewart. I love our moody colors


So there are a few different pictures of our faux wallpaper. We are so pleased with how it turned out!
Wednesday, August 31, 2011
Faux Wallpaper
Well. It was simply a matter of time, really. After all of my talk about how much I love wall paper, and after all of the time I spent on this project...this post was inevitable. First I have to mention that I got the idea for this project from here.

Emily, I like to think of us as friends, has so many cute ideas and I just couldn't resist adapting this fun project. On a side note, isn't it funny how you start to think of bloggers as friends. The other day I referred to a blogger-not-to-be-named child's birthday and then thought :: I'm talking about this person's child and she doesn't even know I exist. WEIRD!
Anyway, this project was so much fun because it was an inexpenisve and not permanent way to get the look of wallpaper without the comittement. Although, my husband would say that 5 days of painting is commitment enough for him! Last fall I decided that it was time to add something fun to our Master bedroom. I loved the idea of wall paper, but couldn't afford the $plurge. So with a little creativity and some elbow grease we have something that we love even more.
First we will start with the final result, and then I will walk you through how we accomplished it!

looks like wall paper doesn't it?
This was a stencil. Not the kind that you order and paint, but the kind that we cut out of paper, transferred to the wall with pencil, and then painted on our pencil lines! But I think I am jumping ahead of myself!
Well, the first step was the main wall color for the room. Before Travis and I were married I painted the room, Grey Area by Behr. I loved the color, but as I said I really wanted to change this up in a major way. So lets hit the basics first:
1. Sample of grey-white paint, Sutble Touch by Behr
2. Paint brush. I wanted something a bit thick, and sturdy (I will explain why later)
3. Stencil
4. patience
First, I choose a light grey/white color to offset the dark grey on the wall. I wanted to keep the wall relatively neutral, although I have seen other ladies do something similar with bolder color choices. The next step was the design and shape of the stencil. I used something similar to Emily although I think our stencil is larger and I made it thicker. Now, at first it can seem confusing how you make this pattern, but really it just takes a steady hand, and either a dang good eye or a level. Lucky my husband has the first two.
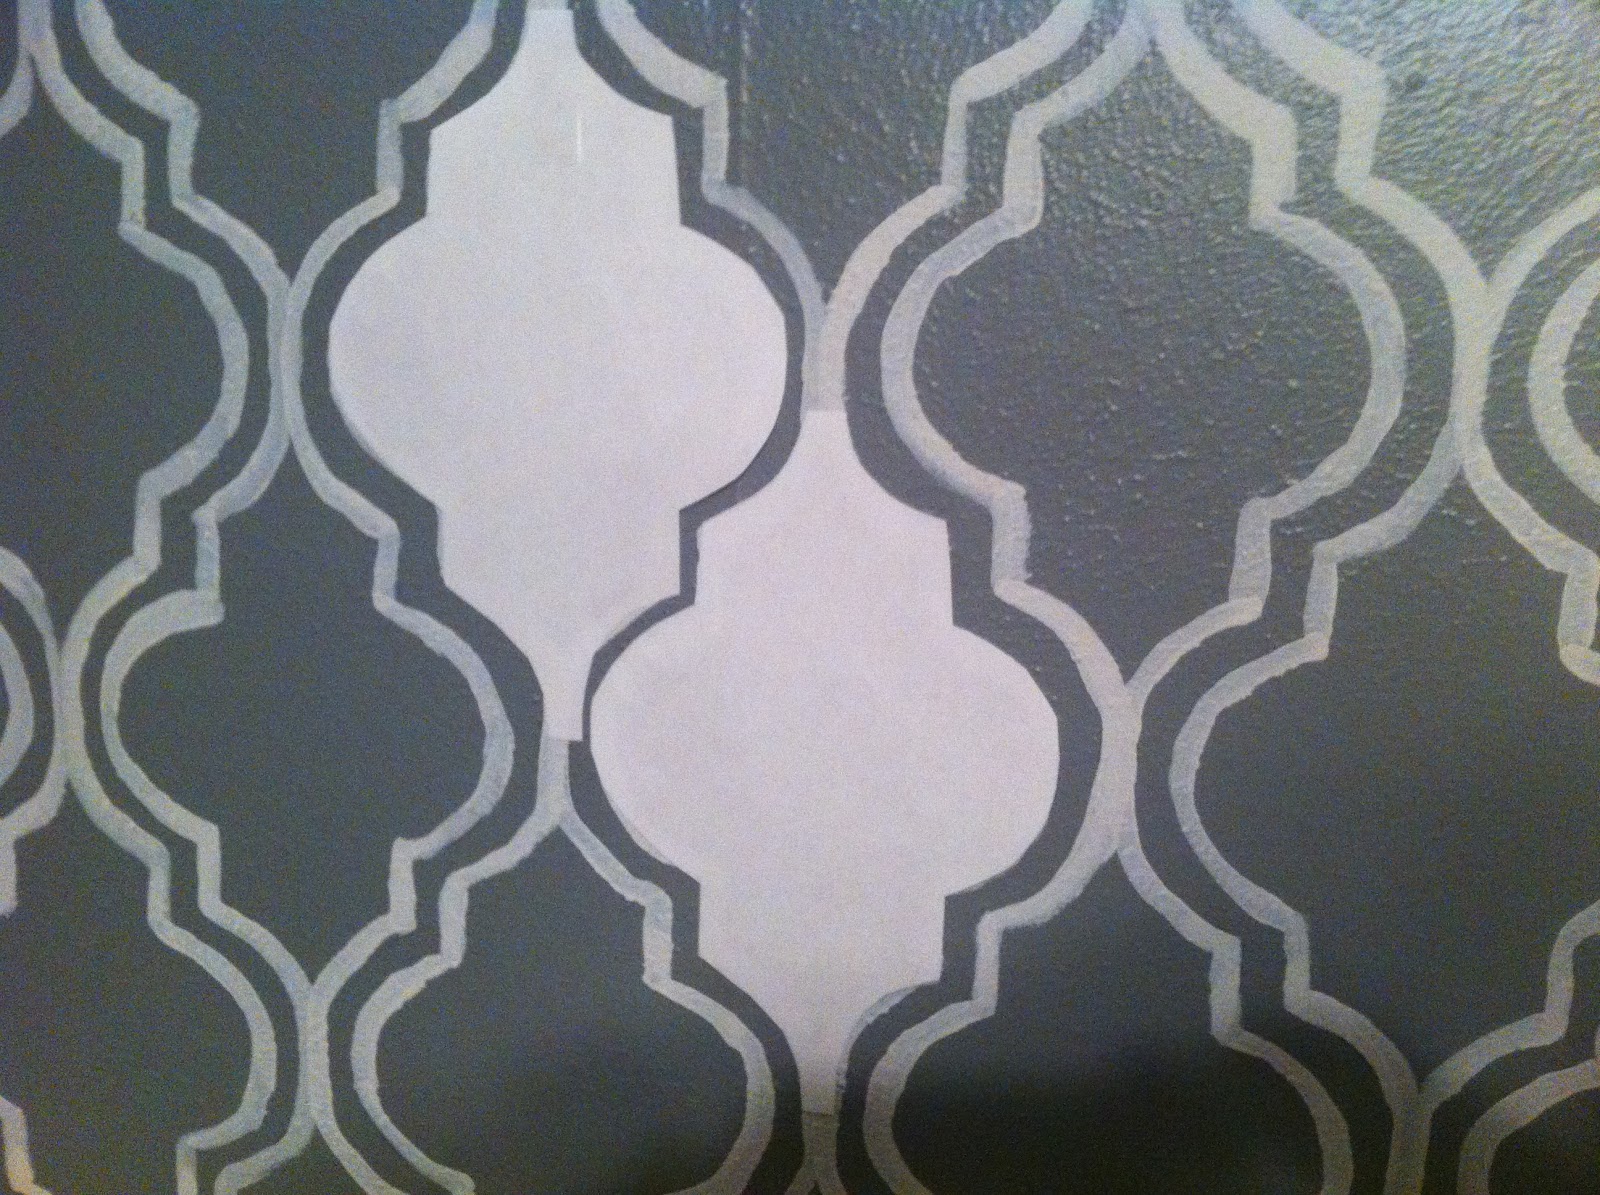
When you move the stencil over and down at the same time it makes the design more intricate and you end up with something similare to this:

If you just move over your pattern would line up and look more like this. Do you see how the stensil in each column touches the column next to it?

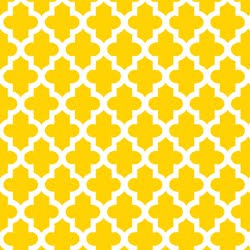
When you compare these images I think it really helps it makes sense. The first images and the second are the SAME stencil. The difference is that the columns are lined up in the same vertical plane in the first, and the stencil is offset about a 1/2" in the second.
Here is an in progress picture. The room became a HUGE mess and we were having to move the furniture around all the time! But I like that you can see the plain grey on the left and compare it to the after.

So, after your second column is made you start to make your third column. And it lines up with your first. Make sense? 1,3,5,7,9 line up. 2,4,6,8 line up. Rinse Repeat. After you have traced in pencil, we did a wall at a time, pain along the inside of your pencil lines with your brush. I liked using a firm brush, I tried several, because it made my paint lines the most consistent. The brush can be as thick or thin as you want it.
Travis and Sydney hard at work!

 I know that I've shown pictures of our room before, so this posts isn't much of a "reveal" but I've gotten so many questions about exactly how we did it that I thought it deserved its own post. We have a bunch of projects in the semi completed phase that I can't wait to show you! Thanks for checking this post out, I really suggest using a stencil (either home made or purchased) if you want to do something different! Its one of the most inexpensive ways to make an impact on a wall or room!
 I'm linked up with:
Remodelahlic
Wednesday, July 27, 2011
We are Siamese if You Please
Well, clearly, we are American. And seeing as how Siam hasn't been used in correct terminology since July 20 1949, we will not ever be Siamese. But we are going to Thailand! Woo Hoo. We are SO excited to start making arrangments to visit Thailand, and even MORE pumped to be able to go with Scott and Rachel MacDonald, our friends from Scotland.
The story? Well, Travis and I have been considering where we would want to go for an end-of-medical school celebration and all the time we were in contact with Scott and Rachel to see if they would be interested in some world wandering, couple style. Recently, we all pretty much settled on going to Thailand. yes.
So, this post will now be dedicated to all thigns Thailand-ish, and how wonderful it is, or will be when we are there! To start with, the people of Thailand are supposed to be very friendly, welcoming of tourists, and exceptionally helpful. As I read about Thailand I have learned of their concept of Sanuk, which means striving to acheive satisfaction and pleasure from whatever you do. Thailand is also called the "land of smiles" because it is a part of the culture to smile and be polite throughout all of your daily interactions. Kinda sounds like Texas, only not.
Bangkok, the city of Angels.
Bangkok, capital of Thailand, can be an overwhelming bustling city for some, but I am determined to spend some time getting familiar with the layout so that we can enjoy all of the culture and life that the city has to offer. The Chao Phraya River splits Bangkok in 2 and is not only a major land mark, but a major means of transportation through the city.

Speaking of transportation, don't you want to ride in a tuk-tuk? I do.
 There is so much to see and do in Bangkok, here a few pictures of just what awaits us!


And outside of Bangkok? Sukothai where there are plenty of ruins for Travis to explore! In Northern Thailand, Chiang Mai. A region known for being lush and beautiful we can spend time out of doors trekking, river rafting, and seeing elephants. Also, there are supposed to be quite a few really good cooking classes, so I will have to see how Travis feels about letting me do that :)

 And, lastly the beaches, Oh the beaches! The beaches of Thailand are consistenly named as some of the most beautiful in the world. There are som beaches good for laying out, other coasts meant for exploring, bays and lagoons reachable by longtail boat, and other beaches that you can actually camp out on if you wish!


 As you can see, we are so excited to get to explore a country with a wonderful history, unique culture, and beautiful landscapes! Has anyone been to Thailand or the area? If so, we would love to hear your advice!
The story? Well, Travis and I have been considering where we would want to go for an end-of-medical school celebration and all the time we were in contact with Scott and Rachel to see if they would be interested in some world wandering, couple style. Recently, we all pretty much settled on going to Thailand. yes.
So, this post will now be dedicated to all thigns Thailand-ish, and how wonderful it is, or will be when we are there! To start with, the people of Thailand are supposed to be very friendly, welcoming of tourists, and exceptionally helpful. As I read about Thailand I have learned of their concept of Sanuk, which means striving to acheive satisfaction and pleasure from whatever you do. Thailand is also called the "land of smiles" because it is a part of the culture to smile and be polite throughout all of your daily interactions. Kinda sounds like Texas, only not.
Bangkok, the city of Angels.
Bangkok, capital of Thailand, can be an overwhelming bustling city for some, but I am determined to spend some time getting familiar with the layout so that we can enjoy all of the culture and life that the city has to offer. The Chao Phraya River splits Bangkok in 2 and is not only a major land mark, but a major means of transportation through the city.

Speaking of transportation, don't you want to ride in a tuk-tuk? I do.
 There is so much to see and do in Bangkok, here a few pictures of just what awaits us!


And outside of Bangkok? Sukothai where there are plenty of ruins for Travis to explore!
 In Northern Thailand, Chiang Mai. A region known for being lush and beautiful we can spend time out of doors trekking, river rafting, and seeing elephants. Also, there are supposed to be quite a few really good cooking classes, so I will have to see how Travis feels about letting me do that :)
 And, lastly the beaches, Oh the beaches! The beaches of Thailand are consistenly named as some of the most beautiful in the world. There are som beaches good for laying out, other coasts meant for exploring, bays and lagoons reachable by longtail boat, and other beaches that you can actually camp out on if you wish!

 As you can see, we are so excited to get to explore a country with a wonderful history, unique culture, and beautiful landscapes! Has anyone been to Thailand or the area? If so, we would love to hear your advice!
Friday, July 22, 2011
Seeing Red.
A few weekends ago a couple of friends met up in a quaint town for a day filled with fun.
Travis and I love the Pillers and had SO much fun getting to hang out with them in Fredericksburg. Brittany and I spent the day browsing while our husbands went to the Nimtz muesum re-inactment and watched them fire off all manner of weapons. We spent the evening enjoying german starches and sausages!
Before we left, my husband humored me with a trip to Red. {secretly, I believe he is upset that my sister-in-law ever introduced me} I could spend quite a few hours walking around the store and drawing inpiriation. Here are just a few things I found interesting!
 I love these light fixtures, made from cardboard rings! And that print in the background!
coasters. penny for your thoughts?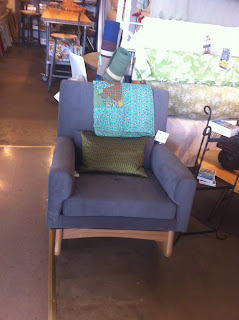 Sleepy time rocker. perfection.
The truth is that sometimes its the little things that make me the happiest, like an hour spent walking around Red. Here is hoping that we will always be filled with inspiration!
Wednesday, July 13, 2011
Hello, Mr. Eames
As Travis prepares to make me the ultimpate DIY 2 person parsons desk, my attention has turned to seating. I am sweating some pretty Eames chairs. Just imagine a long sleek laquered white desk with a lovely Eames chair pulled up to it. Oh, as a matter of fact, you won't need to imagine it. Here is a picture of the real thing from Houzz: 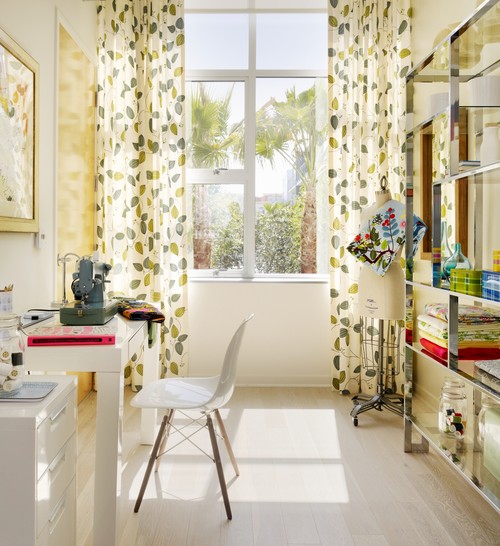
Lovely, right? In my search to find the right Eames chair I thought I would share what I have come across:
First up, a post I found on Craigslist in Houston: http://houston.craigslist.org/fud/2418770304.html. Which has this Robin's Egg Blue Eames rocker for sale at a bargain price of $178. Unfortunately, its not really the color I had in mind. However; the ad directed me to another website, http://www.modiish.com/. Have y'all ever heard of it? I hadn't. But I'm starting to appreciate it quickly. Look what else I found!
Lovely, right? In my search to find the right Eames chair I thought I would share what I have come across:
First up, a post I found on Craigslist in Houston: http://houston.craigslist.org/fud/2418770304.html.
 Which has this Robin's Egg Blue Eames rocker for sale at a bargain price of $178. Unfortunately, its not really the color I had in mind. However; the ad directed me to another website, http://www.modiish.com/. Have y'all ever heard of it? I hadn't. But I'm starting to appreciate it quickly. Look what else I found!
These are so lovely, and affordable!. Or more affordable at $158 a chair. I like the molded chair because I feel like it could be multi purpose, and I think it has more pizzazz! Also on my list of things I love are lucite or ghost chairs. Here is one they offer for $178, again reasonably priced, relatively speaking.  Yes. Please.
As you may have guessed, the reason these are so reasonably priced is because they are "high quality reporductions of the original." I did manage to find some used originals on ebay.
Here is a shell rocker in what the seller describes as golden wheat in color. Currently the bid is at $99, I believe. Its the shell rocker and not the molded form I prefer. But it is still quite lovely. And I secretly dig the grellow color.http://cgi.ebay.com/Herman-Miller-Eames-side-shell-rocker-/180692190134?pt=Antiques_Furniture&hash=item2a121803b6 
Next, these chairs are a steal for someone with the knowledge to fix-er-up! Four of these chairs for $300. The seller admits they need refurbishing. I think if you knew how these could be so perfect!http://cgi.ebay.com/Herman-Miller-Eames-vinyl-shell-chairs-qty-4-/170665099413?pt=Antiques_Furniture&hash=item27bc6ec095
And, I have to admit I have a particular fondess for this one. She is not the color that I had in mind. Seeing how my entire house is a retro green I assumed that I would do green. But her punchy pink/red is kinda cute! And $250 buy-it-now price is not so bad either! http://cgi.ebay.com/Vtg-EAMES-HERMAN-MILLER-RED-ROCKER-ROCKING-SHELL-CHAIR-/180692889373?pt=Antiques_Furniture&hash=item2a1222af1d Well, I don't imagine I will be doing anything, anytime soon with any of these chairs. But oh how I love to dream. One of these days I will find the perfect Eames chairs for us! Until then I suppose I will just keep looking at pictures!
Subscribe to:
Posts (Atom)


