Wednesday, July 27, 2011

We are Siamese if You Please

Well, clearly, we are American. And seeing as how Siam hasn't been used in correct terminology since July 20 1949, we will not ever be Siamese. But we are going to Thailand! Woo Hoo. We are SO excited to start making arrangments to visit Thailand, and even MORE pumped to be able to go with Scott and Rachel MacDonald, our friends from Scotland.

The story? Well, Travis and I have been considering where we would want to go for an end-of-medical school celebration and all the time we were in contact with Scott and Rachel to see if they would be interested in some world wandering, couple style. Recently, we all pretty much settled on going to Thailand. yes.

So, this post will now be dedicated to all thigns Thailand-ish, and how wonderful it is, or will be when we are there! To start with, the people of Thailand are supposed to be very friendly, welcoming of tourists, and exceptionally helpful. As I read about Thailand I have learned of their concept of Sanuk, which means striving to acheive satisfaction and pleasure from whatever you do. Thailand is also called the "land of smiles" because it is a part of the culture to smile and be polite throughout all of your daily interactions. Kinda sounds like Texas, only not.

Bangkok, the city of Angels.

Bangkok, capital of Thailand, can be an overwhelming bustling city for some, but I am determined to spend some time getting familiar with the layout so that we can enjoy all of the culture and life that the city has to offer. The Chao Phraya River splits Bangkok in 2 and is not only a major land mark, but a major means of transportation through the city.


Speaking of transportation, don't you want to ride in a tuk-tuk? I do.

There is so much to see and do in Bangkok, here a few pictures of just what awaits us!


And outside of Bangkok? Sukothai where there are plenty of ruins for Travis to explore! In Northern Thailand, Chiang Mai. A region known for being lush and beautiful we can spend time out of doors trekking, river rafting, and seeing elephants. Also, there are supposed to be quite a few really good cooking classes, so I will have to see how Travis feels about letting me do that :)
And, lastly the beaches, Oh the beaches! The beaches of Thailand are consistenly named as some of the most beautiful in the world. There are som beaches good for laying out, other coasts meant for exploring, bays and lagoons reachable by longtail boat, and other beaches that you can actually camp out on if you wish!


As you can see, we are so excited to get to explore a country with a wonderful history, unique culture, and beautiful landscapes! Has anyone been to Thailand or the area? If so, we would love to hear your advice!

Friday, July 22, 2011

Seeing Red.

A few weekends ago a couple of friends met up in a quaint town for a day filled with fun.


Travis and I love the Pillers and had SO much fun getting to hang out with them in Fredericksburg. Brittany and I spent the day browsing while our husbands went to the Nimtz muesum re-inactment and watched them fire off all manner of weapons. We spent the evening enjoying german starches and sausages!


Before we left, my husband humored me with a trip to Red. {secretly, I believe he is upset that my sister-in-law ever introduced me} I could spend quite a few hours walking around the store and drawing inpiriation. Here are just a few things I found interesting!
I love these light fixtures, made from cardboard rings! And that print in the background!


coasters. penny for your thoughts?

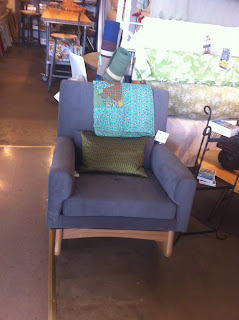
Sleepy time rocker. perfection.


The truth is that sometimes its the little things that make me the happiest, like an hour spent walking around Red. Here is hoping that we will always be filled with inspiration!

Wednesday, July 13, 2011

Hello, Mr. Eames

As Travis prepares to make me the ultimpate DIY 2 person parsons desk, my attention has turned to seating. I am sweating some pretty Eames chairs. Just imagine a long sleek laquered white desk with a lovely Eames chair pulled up to it. Oh, as a matter of fact, you won't need to imagine it. Here is a picture of the real thing from Houzz: Gallery Loft modern home office

Lovely, right? In my search to find the right Eames chair I thought I would share what I have come across:

First up, a post I found on Craigslist in Houston: http://houston.craigslist.org/fud/2418770304.html. Which has this Robin's Egg Blue Eames rocker for sale at a bargain price of $178. Unfortunately, its not really the color I had in mind. However; the ad directed me to another website, http://www.modiish.com/. Have y'all ever heard of it? I hadn't. But I'm starting to appreciate it quickly. Look what else I found!


These are so lovely, and affordable!. Or more affordable at $158 a chair. I like the molded chair because I feel like it could be multi purpose, and I think it has more pizzazz! Also on my list of things I love are lucite or ghost chairs. Here is one they offer for $178, again reasonably priced, relatively speaking. Yes. Please.


As you may have guessed, the reason these are so reasonably priced is because they are "high quality reporductions of the original." I did manage to find some used originals on ebay.


Here is a shell rocker in what the seller describes as golden wheat in color. Currently the bid is at $99, I believe. Its the shell rocker and not the molded form I prefer. But it is still quite lovely. And I secretly dig the grellow color.http://cgi.ebay.com/Herman-Miller-Eames-side-shell-rocker-/180692190134?pt=Antiques_Furniture&hash=item2a121803b6
Next, these chairs are a steal for someone with the knowledge to fix-er-up! Four of these chairs for $300. The seller admits they need refurbishing. I think if you knew how these could be so perfect!http://cgi.ebay.com/Herman-Miller-Eames-vinyl-shell-chairs-qty-4-/170665099413?pt=Antiques_Furniture&hash=item27bc6ec095
And, I have to admit I have a particular fondess for this one. She is not the color that I had in mind. Seeing how my entire house is a retro green I assumed that I would do green. But her punchy pink/red is kinda cute! And $250 buy-it-now price is not so bad either! http://cgi.ebay.com/Vtg-EAMES-HERMAN-MILLER-RED-ROCKER-ROCKING-SHELL-CHAIR-/180692889373?pt=Antiques_Furniture&hash=item2a1222af1d Well, I don't imagine I will be doing anything, anytime soon with any of these chairs. But oh how I love to dream. One of these days I will find the perfect Eames chairs for us! Until then I suppose I will just keep looking at pictures!

Tuesday, July 12, 2011

Hello Friend

Oh, actually, no sorry, I wasn't talking about you. I was talking about a different friend. I was really talking about her. Travis and I LOVE her. And do you know what I love most? How much Travis loves her!
Isn't she beautiful? Saturday the 9th was my birthday. And knowing me as Travis does, he decided that we would spend the afternoon looking for a thrift store console that we can re-do for the new tv that we don't yet have, but plan to buy later! Kinda a perfect afternoon in my book, so after a bite a Belly's cafe we were off! p.s. -- Lubbockites have you ever eaten at Belly's? I hadn't. Its downtown on Ave. Q and 19th-ish right across the street from the big American State Bank. Anyway, its not fancy, but I was pleasantly surprised. More than just a greasy hamburger, anyway.

I'm digressing, sorry. So after we ate and were on our way, I asked Travis if we could stop at Grand Central Station antiques. There is a vendor there that has some beautiful demi johns, which I also love, but don't really see them melding well with our house! Anyway, I still wanted to show them to Travis.
But, while we were browsing her stuff we found our new and much loved friend instead! Now, the other part of the story that you are missing is that we have been looking for something to put at the end of our bed for, well, forever I guess. Anyway, it couldn't be too big because the space is small and for that same reason we wanted something with legs that was not bulky feeling. Not anything with dark wood or fabric because we already have dark charcoals etc. in the room. Anyway, when we saw her we were in love. And then we found out she had a sister, yessss.


Now, I might have passed on these, just because I knew that if we tried to DIY it ourselves we could probably come up with a probably not as pretty, but definitely a less expensive version. Travis however negotiated with this lady, who was surprisingly nice, and we got to take them home with us!
So, here is what they look like in our room. We love them! And now our pillows aren't land mines in the middle of the floor when you get up to go to the bathroom at night!


And, incase you would like to see more birthday related pics...here they are! Travis spent the whole day thinking of things I would like to do. We woke up early in the morning to go garage sale-ing (I have loot to share!), I got my hair done, went thrifting, took a well deserved nap, ate Italian for dinner, and finished the evening with a Humphrey Bogart movie, The Maltese Falcon. Ohhh, and check out the pretty flowers and sunglasses Travis gave me for my quarter century anniversary! {25 is not old, 25 is not old, 25 is, ok I'm getting a little up there}


I love billy balls!
cat-eye sunglases that were inspired by January Jones, not that I am obsessed with her strictly speaking, ok, honestly I am obsessed with her. And mad men. And her.


Thanks for all of the birthday wishes, it was such a fun weekend! Next, I can't wait to show ya'll some of the stuff Travis let me get while thrifting.

Thursday, July 7, 2011

Meet our couch

I know that I told ya'll about the couch that Travis let me buy last year for my birthday. In case you forgot what it started out like here is a quick picture!


Here she is in all of her glory!
We found her at a flea market, and I fell in love with her instantly. Travis and I had wanted a new couch since we married (we had been using my gramma's old couch with a slip cover) but had some issues in deciding what to do. First, we really wanted a sectional, but found that all of the long sleek sectionals we liked didn't fit in our bungalow sized living room. And the ones that would fit....just didn't seem like something we would be interested in after we moved from this house. So, we shelved the idea of a new sectional and started thinking about other options, we actually hadn't decided what to do when we met this gorgeous girl! And all at once, everything made perfect sense. She would fit perfectly in our living room, and once we left this house we would put her in a bedroom to make room for the sectional of our dreams. There was only one hitch; her previous owners weren't even planning on selling her. I had to visit this flea market twice before I finally twisted their arm. I could tell she had been neglected, but her wood frame was intact and her lines were so lovely!

When we got her home we were able to inspect her more closely to see that she really was gonna need some work, and we didn't know how to do it all. After some research we learned that couches of this age had springs that were hand-tied, and all of hers had come loose. We found a local crafstman who could re-tie her springs and fix the webbing on the bottom keeping her all put together.


Before we sent her off, we took needle-nose plyers to her and carefully removed every bit of fabric from her frame!
While she was being worked on we searched for fabric! Now, since we are a young couple not yet burned with the sensibilities of true adulthood we decided that we wanted to something fun. When we do finally get a sectional we will probably opt for charcoal grey that will wear well and hide blemishes, but for now we wanted something different. The green walls of our living room have a smokey hue to them so we started there. Seeking out patterns and options that would be just perfect until we found this: Thomas Paul's Parasols fabric in chartreuse. We instantly were drawn to this choice! Since it is on the dark side we decided to paint the wood frame of the couch white, Dover White by Benjamin Moore, to keep things from being too dark and to give it a punch!


After the springs had been fixed on the couch it was just a matter of a quick paint job and some reupholstering for us to have this:


We are so pleased with our new addition to the living room! Can't wait to show ya'll what its all starting to look like up in here!


To check out tons of DIY's and Before & Afters click on the images below or over to the side. There are so many great ideas out there...

Remodelaholic


Head board. Stage Two. Logistics

After figuring out the direction we were going. It was -merely- a matter of figuring out exactly how to get there. So, here is the mental break down about how we decided to do it.

First, plywood from HD that Travis later cut to our exact shape. The only snag was that the plywood wouldn't be thick enough on the sides, seeing as we wanted a thick plush looking headboard. We didn't want to spring for the thicker wood for the whole headboard, so we decided to put 1x4s along the edges. That gave us the thickness we needed at the edges without increasing the overall cost. Slowly, but surely, I am learning to think about the bottom line!

Here is a picture of the back of the head board, you can see the edges of the head board made more substantial by the 1x4s. Also, you can see the simple way Travis was able to line the arch with the wood. He just cut several small squares and then used each one to line the edge of the arch. As he did this he gave me a refresher in calculus or geometry or something saying "libby, a circle can be approximated at any point with an infintestimal amount of lines that change slope to fit the angle of the circle." Clearly, I didn't really learn anything from his lecture because what I just wrote makes no sense.

Here you can see some of our books, finally being put to good use, helping the wood glue attach the side supports to the plywood!


Another thing to consider were how we were going to make the legs work. We made the legs out of 2x4s and positioned them so that they butted up against the bottom of the 1x4s. Now, since they were going to be on the outside edge of the headboard they would be visible. So we didn't want to leave them raw. At first we thought we would just cover them in our fabric and attach them at the very end, but that made my structural engineer nervous. He wanted them to be attached with wood glue for the best possible hold and support. And really, who am I to argue with that?

So, we decided to attach the legs to the raw plywood before we upholstered the headboard. Then as a very last step we wrapped the legs in fabric, letting the fabric butt up under the headboard so there weren't any seams, and cutting out holes in the fabric so we could attach the legs to the bed frame.


Here is a picture of the legs being attached.

Everything else was pretty simple. We had to decide how thick our foam needed to be. Foam ranges from 1/2" thick to 5" thick. Now, since we were (still are) planning to do both nail head trim and tufting I had to think. I wanted the foam to be thin enough to nail the trim into, but I wanted it to be thick enough to make the fabric pucker nicely when we do the tufting. So I settled on the 1" thick. 2" felt way to thick and 1/2" didn't feel like it would work as well for the tufting. I will let you know how that ends up working out!

Besides that, everything was as simple as can be. Lay the ply wood on the floor, cut foam to the proper shape, and attach with spray adhesive. Later, lay the batting out and place the headboard {face down} on top of it. Pull the batting taught over it and stapple to the back . To keep things simple we pre-cut the batting around the legs before bending it back and stappling!


Later still, (and after hours of ironing) spread the fabric out and place the headboard {face down}on top of it. Pull the fabric taugh and stapple to the back.


And here is a picture of the {almost} finished product
As I mentioned earlier, we still have yet to attach the nail head trim and do the tufting. I have heard about a few different techniques for the tufting, so we plan to try them both out on a sample before going to town on the real thing! Anyway, I thought that maybe putting up some pictures and letting y'all know what we have going on now might help give me some motivation to continue our project!

Head Board. Stage One. Inspiration.

Making an upholstered headboard can't be that hard right? And when I looked online I found several resources for making a headboard, all a little different, each one with its unique techniques. As I started doing this -- one of the easiest and most popular DIY projects out there -- I couldn't figure out how to go at it. Enter my husband. I have known for some time now that God made us perfect companions to each other, compliments in so many ways, but not until we started this project did I realize how intertwined we are. You see, I couldn't figure out what would work best for us because all I had was the picture of the end in my head. I couldn't figure out how to combine all of the options to get to where I was wanting to go. Thankfully, I married an engineer. Not just an engineer, but a perfectly patient man who could walk me through all of the different options, and explain to me what kind of out come could be expected from each step!


So, where did we start? With some inspiration. I found this lovely head board at a small shop in Houston. Its price tag a meer $2,000+ was not so lovely.


This is what I wanted the head board to look like in the end. But I had so many questions. How tall did it need to be? How large of a circle should we cut out on each corner? I wanted the proportions to be just right. So, what did we do? What else, turn to auto cad!


I know that you can't see all of the details that my husband lovingly put into this auto cad drawing, every single measurement, the tufting and nailhead trim, and the thing of the left? Oh thats what the head board looks like from the side! But the thing that helped me the most was getting to see the scale of the thing. Understanding how changing the arch of the curves, or the width between tufts, or the lines of the nail head would effect the end result. This was exactly what I needed, and so far this was the hardest part!


Now, I know that not everyone has access to auto cad, but the same result can be acheieved by making drawings to scale until you get a result that you like. Trust me, we had to make several adjustments to get to our end result!


So, what did I learn from this project? I used to think that I wasn't crafty or creative or anything. What I realized is that when I did things previously, I wanted my projects to come together without having to think them through, but that just isn't reasonable! So many people that do things themselves and are labeled as "creative" really have to think to work out the details. (and thats ok!) So, now that I am armed with this knowledge I feel like with enough planning and work we can tackle any project we want!